Reinhardt Like shield shader
ReinhardtLike-Shield-ShaderForge

![]()
![]()

![]()

Hi! Here is a shader ive made to emulate Reinhardt shield effect using shaderforge on Unity3D. Its completely free and can use it as much as you want in all the projects you want :D
HOW TO
Prerequisites
First of all, we will need this two assets to have all the tools for this effect
ShaderForge for unity 2018.2, its open source now: https://github.com/jackisgames/ShaderForge

PostProcessingStack, its official from unity technologies: https://assetstore.unity.com/packages/essentials/post-processing-stack-83912
OK! now we have only on thing to do before starting to make the shader. The mesh that will contain our shader, you will be able to download it from this project.
Head up to unity menu and go on “Window–> Shader Forge” and this window will pop up:  Hit “New Shader” and then “Custom Lighting”, then, save it wherever you want INSIDE the project and call it however you want, but if its something weird be sure to remember it.
Now, a lot of nodes will apear, the default nodes of the custom lightning template shader. Select all(Select more than one node holding ALT and dragging with the mouse, like on windows but with ALT) and delete them because we wont use it for our effect.
Before any node, we have to set up the : shader settings, lighting, geometry and Blending settings.
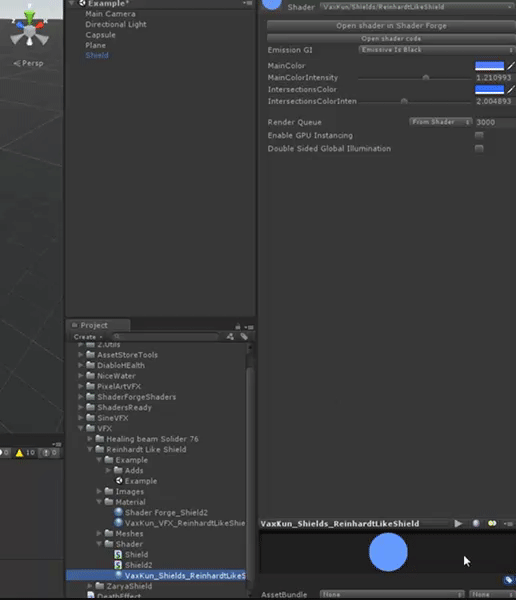
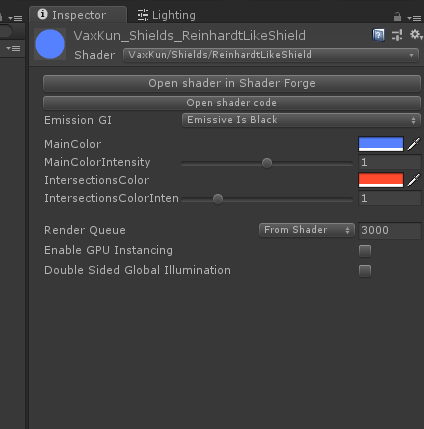
- Shader Settings: I normally like to have all my shaders under “VaxKun” so i can recognise it fast on the list, and then depending on the project, in this example we will be using groups to divide diferent type of effects: “VaxKun/Shields/ReinhardtLikeShield”

- Lighting: some of them are the default because of the lack of lightning on this effect(sarcastic because is kind of an hologram) will change from custom lightning to PBL, if we later want to have some lightning things on it. On Specular/Metallic i normally like to work with Specular (if the object isnt metallic)

- Geometry: we do want our effect to be displayed in two faces of the mesh. If Backface culling is selected, one side of the mesh will not display the effect. SO, Double Sided on Face Culling.

- Blending: the effect isnt opaque, so, we want it to be kind of transparent or atleast control transparency all over the mesh, with this effect we are using Alpha Blended. Now, on Console (upwards) a Warning will pop up. That is not a problem, it only says that our mesh is slpha blended but opacity is not connected, but we will connect it later so dont go crazy.

PERFECT! we are nearly done with shader settings! The last thing is in terms of shader preview, we can set up the mesh, click on the little circle near where says “Sphere” and select the mesh you want to be with the effect, THIS IS OPTIONAL, and not required for the shader to work. Ah! dont forget to uncheck Skybox on the preview, there is a bug on shader forge wich make the nodes not visible with skybox checked on preview. Finally click Settings button and check “Use scroll in the quickpicker” and “Show node browser panel”

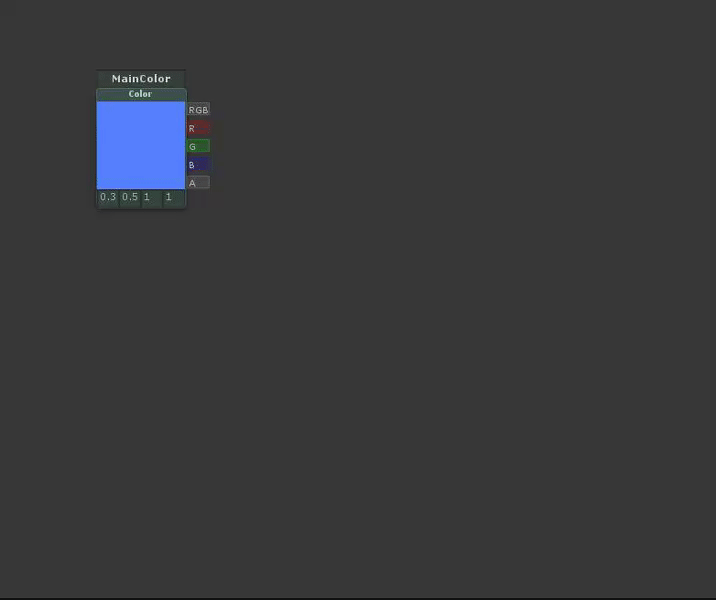
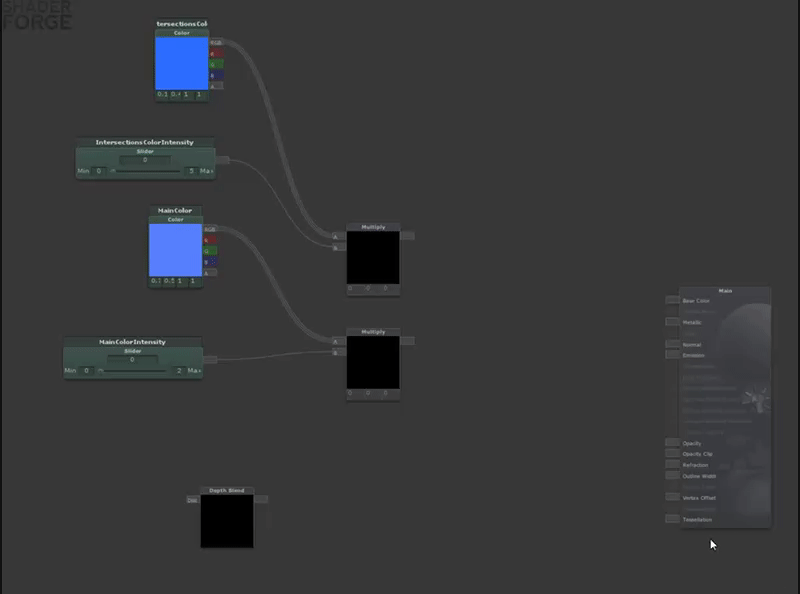
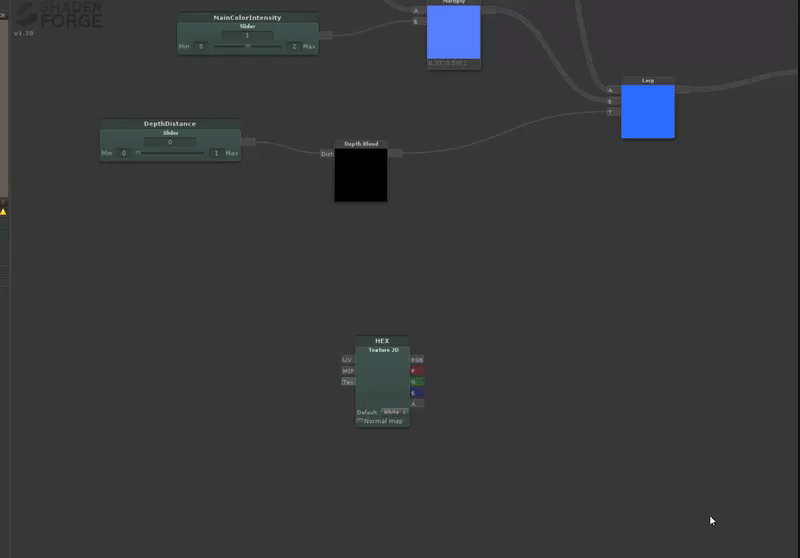
Our shader now is pretty boring, all black. So, we are going to start with the coloring. We will start with the MainColor. We will have a Main Color and an intensity of that color, so we are going to hold C and see a list of nodes appear where the mouse is. Scroll with the mouse to the greenish “Color” and then click it. You will se the color node appearing.

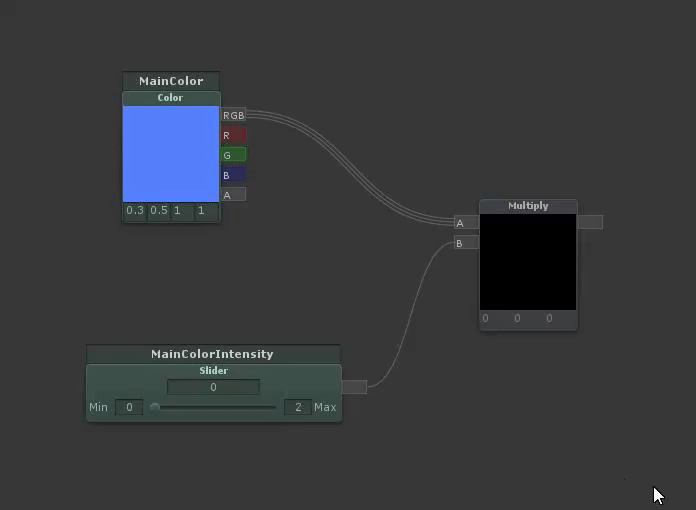
Click on the name (node_XXXX) and change it, because of this is the MainColor i will call it that way. Ive selected too a blue color in it, here is the Hexadecimal: 5581FF. Ok next we are going to create a slider for the MainColorIntensity and Add both nodes to a Multiply node (Hold S and scroll to the green Slider)(Hold M and scroll to Multiply, but in this case is the first so you dont have to scroll)
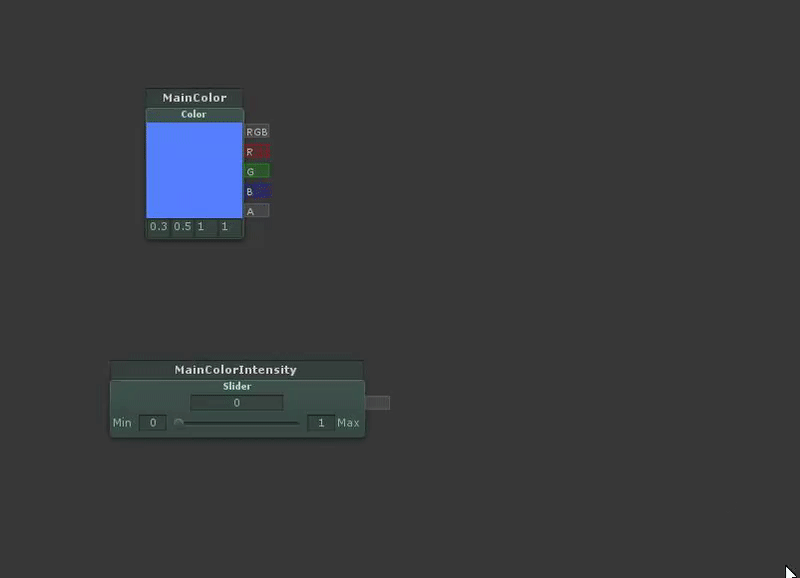
Because of how colors are, as you can see in the bottom of the color node, colors are a percentage of a color mix, so what we are doing with intensity and multiply is multiply this color and make it higher, the result will be clearer when we add the bloom with the post processin, but you can mess with it, in this case im going to put the Max intensity at 2, now you will be able to test out
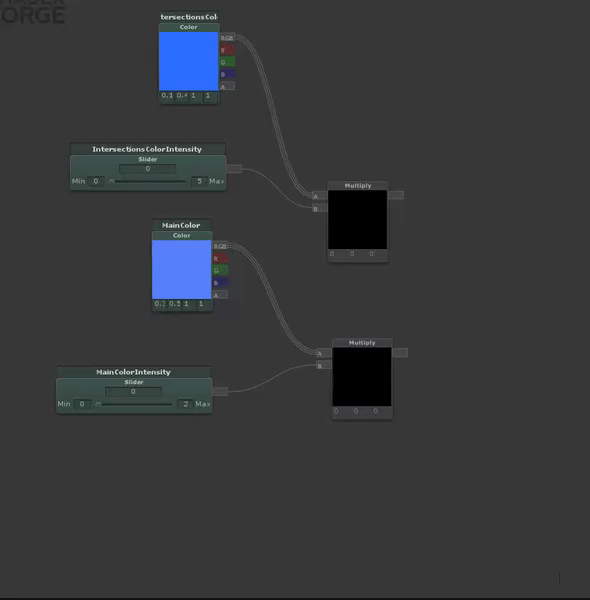
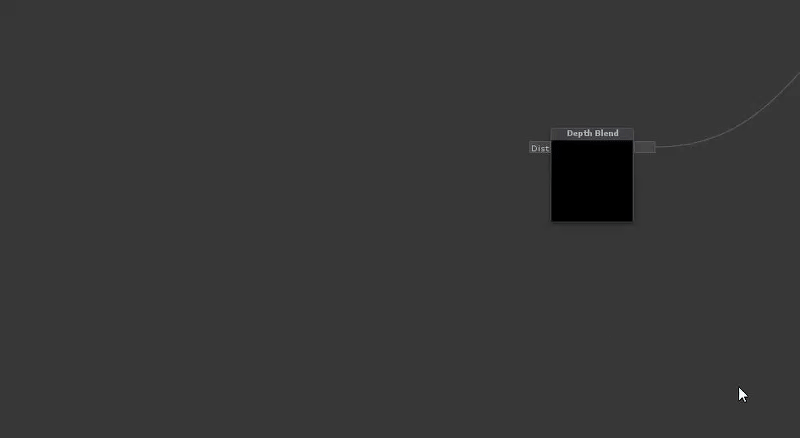
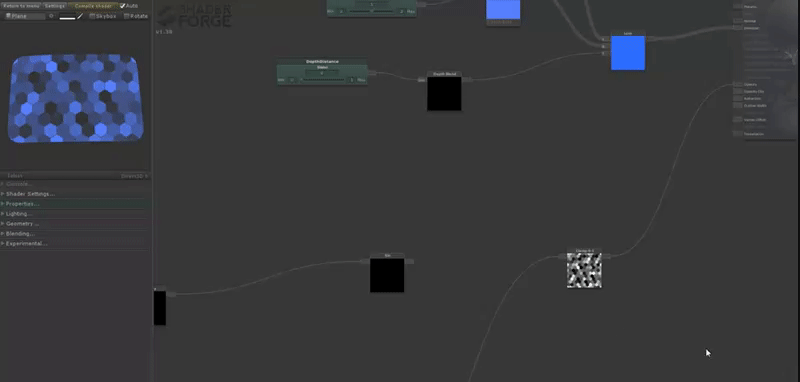
If you connect it to “Emission” on the MainNode (The bigger node) you will be able to see the color on the mesh, but, thats not what we want. What we want is that color but in certain parts of the mesh, (in this case the borders of the mesh and a “hex” guide on the rest of the mesh). Before doing that guide we are going to do the “intersections”, we are going to use the Depth Blend node to achieve this effect, and because we rock about making shaders, we are going to add another color. Exactly the same 3 nodes we made before but with other name, you can call it IntersectionsColor, DepthBlendColor… So, lets add this node holding D scroll waaay down to “Depth Blend”
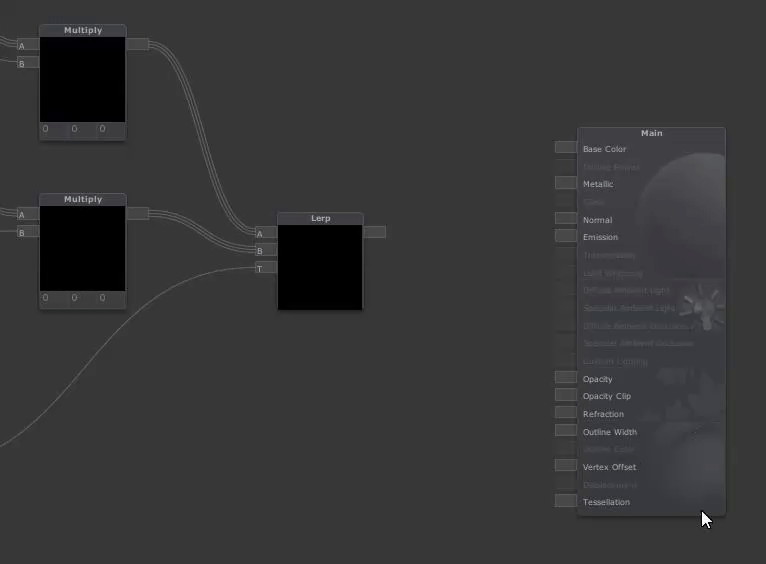
But oh! we have 3 nodes and we need to connect all of them to Emission and we have to say to the 2 colors where to appear :/ In this moment is when our best friend called “Lerp” appears. This node will LERP between 2 inputs based on another input. So, lets hold L, scroll to lerp and connect the 2 colors A and B (A and B are the 2 inputs to lerp) and Depth Blend to T (Thats the “guide” for A and B to lerp between).
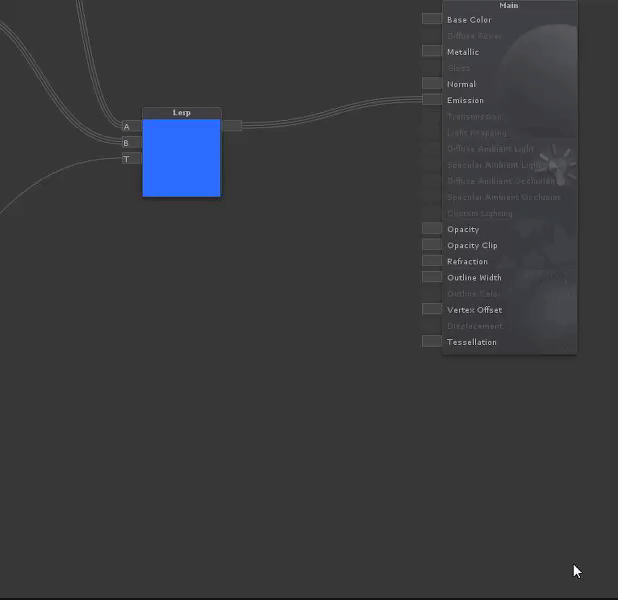
And connect that lerp node to Emission, then Hold V and add the “Value” node (the grey one), type “1” into the value, and connect it to “Opacity”
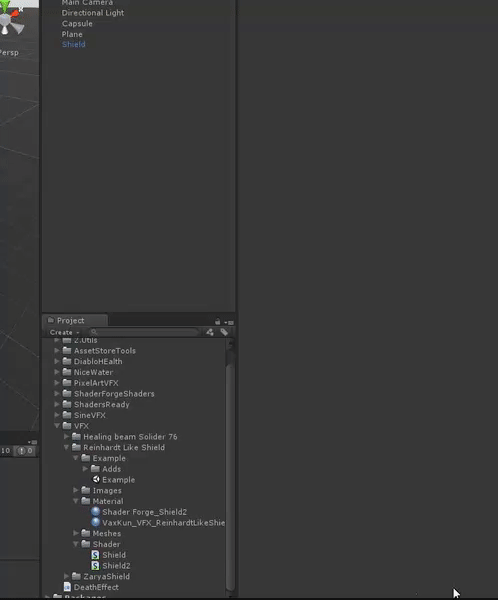
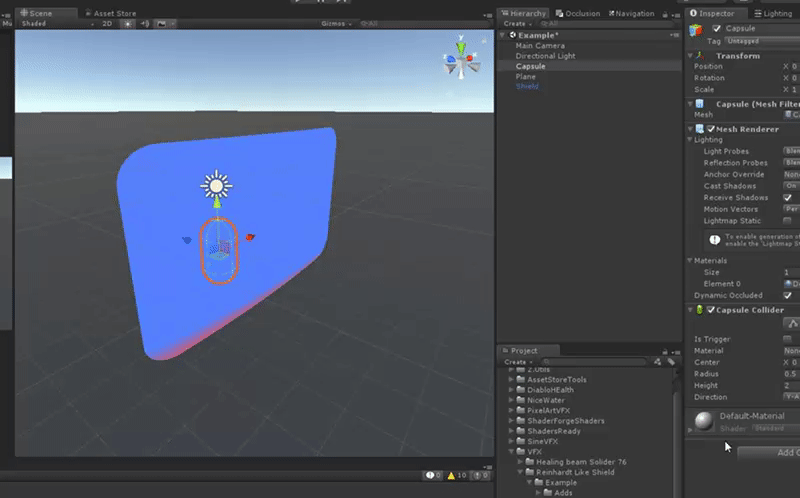
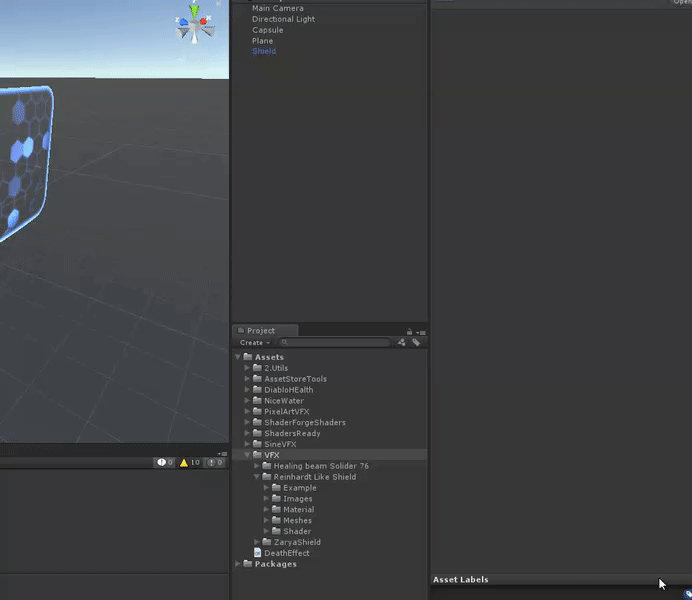
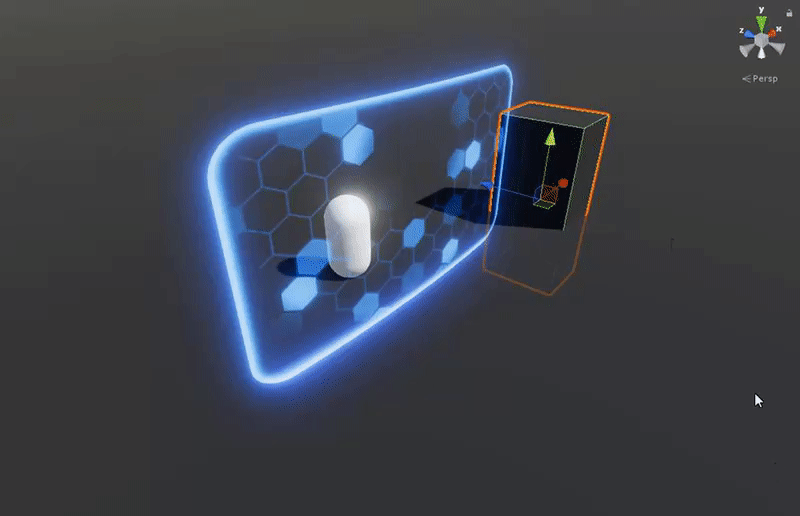
Nice! lets test it out. Create a material of the shader on unity and add it to a mesh
Now to see it clearer im going to set Intersections Color to a red so you can see what is doing DepthBlend, and im setting MainColorIntensity and IntersectionsColorIntensity to 1 for this example. you will se that “intersections” with other meshes
Ok, lets return to ShaderForge, dont worry if you closed it. You can open with the menu we opened on the start of the tutorial or with this nice button ShaderForge made for us on the material or shader file on unity: “Open shader in Shader Forge”
We are going to add a Slider, call it Depth Distance and connect it to the DepthBlend node input, and now we will be able to handle the distance this intersections will have on our mesh!! (obviously i dont have to say you can test all the things we are adding without me to saying to test it)
Now we made the “easy” things!! but dont go crazy, i will be here explaining all the rest and why are we adding the rest of nodes, i bet you will say something like: “wait, ive made this whole node tree?!?!?”.
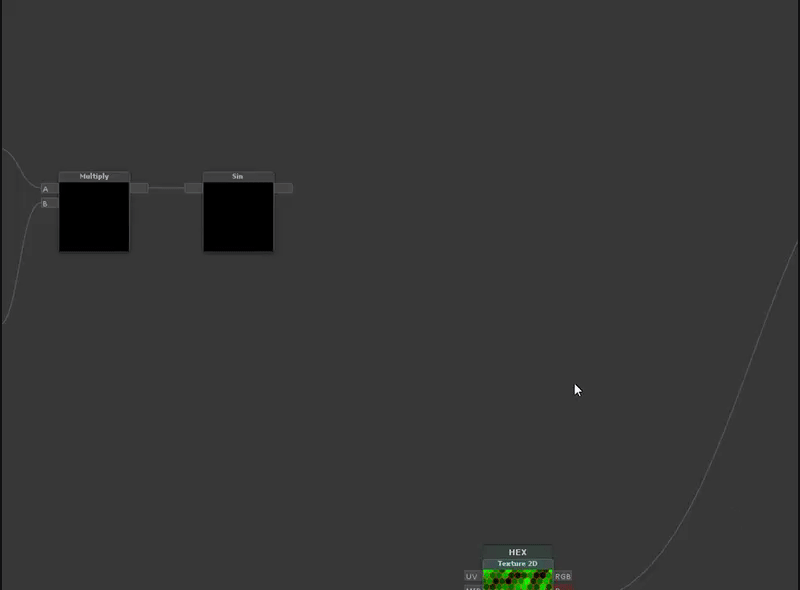
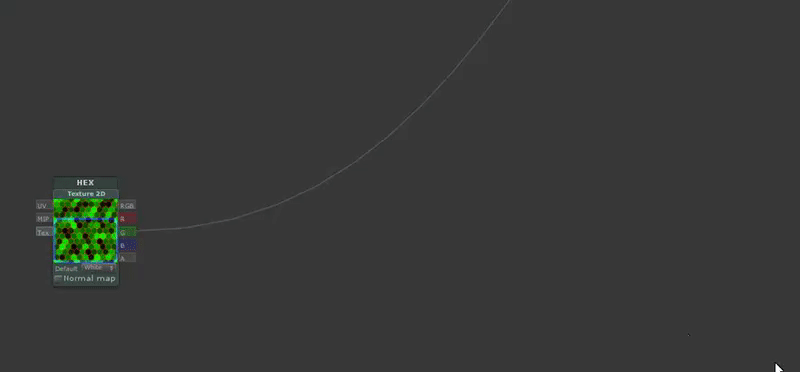
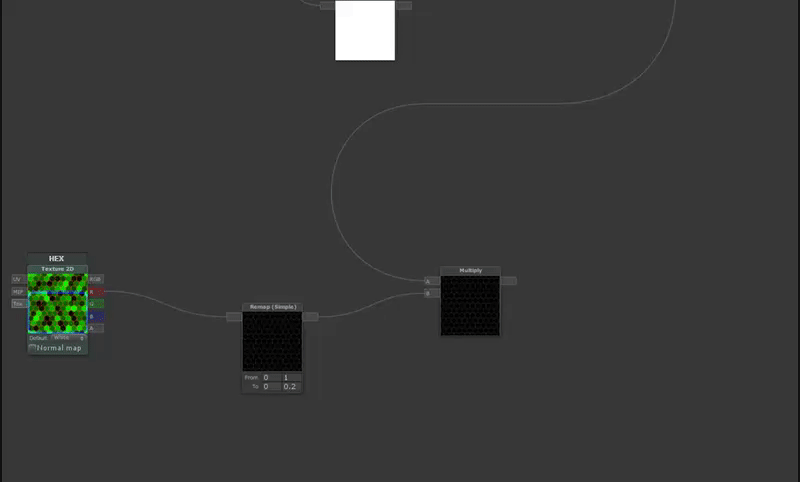
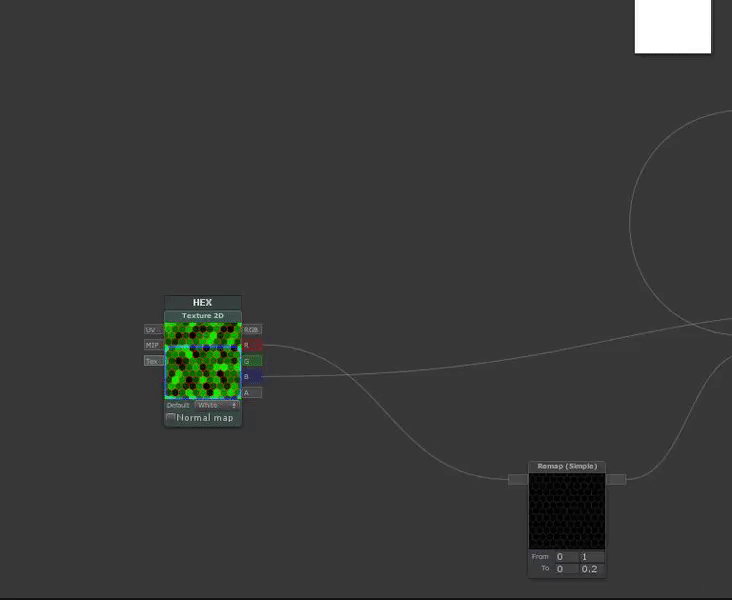
We will start deleting the “Value” node we made before and adding the Texture that will be used as a guide for our shader. So hold T and add the “Texture2D” node, the green one. Then, add the image with the guide (in this case you can find it inside the project, its called Hex)

I think its the perfect time to explain to you why is this image red, green red and kind of very strange. Thats why ive merged 3 images in 1, ill explain myself: The guides used in this cases are grayscale, that means we dont need 3 percentages of color to make 1 color, we only need 1. So in photoshop, ive used Red channel to put one guide, Green channel to put another guide, and Blue to another guide, as you can see if i split the channels with Comp.Mask node on shader forge:
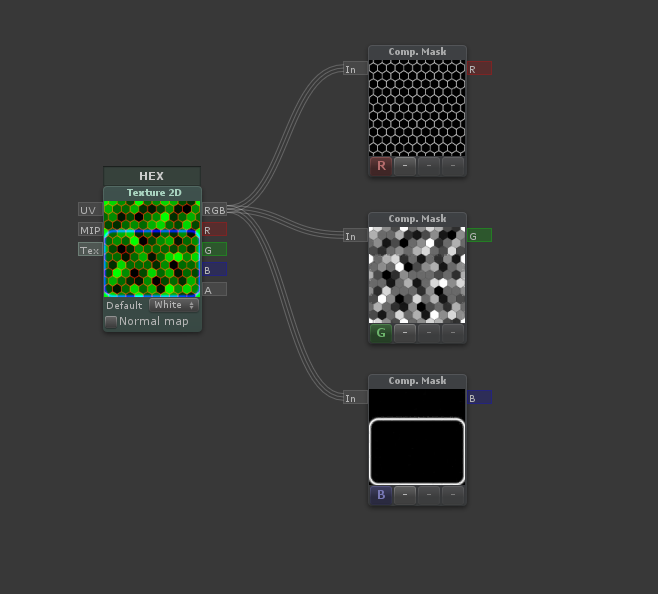
Dont worry im not going to start on how to do that step by step on photoshop, as i said you have the image on this project(like all assets needed to achieve this effect).Now, lets hold C and scroll to click on “Clamp 0-1” node, next, connect R or G or B to the Clamp node, and connect Clamp to Opacity to see what are doing with the guides.
Pretty nice! the guides are nicely added. But we only can see the channel we are adding and isnt animated or waves or nidfjgndgkdng. Calm down, step by step, lets do the animated waves :)
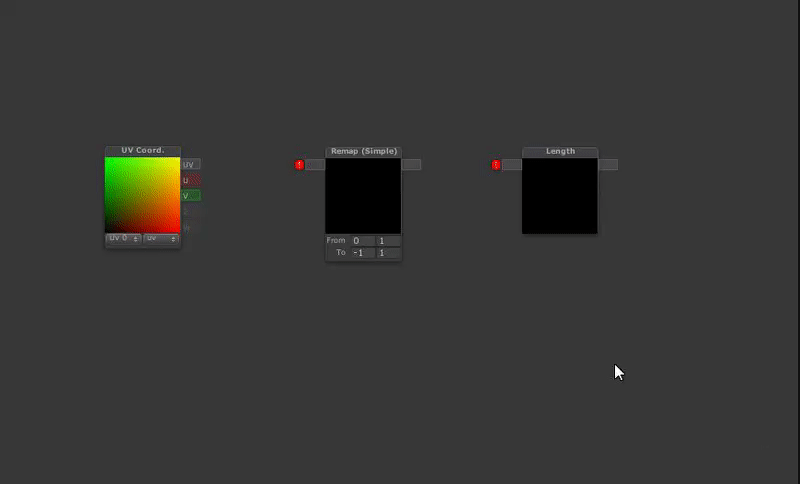
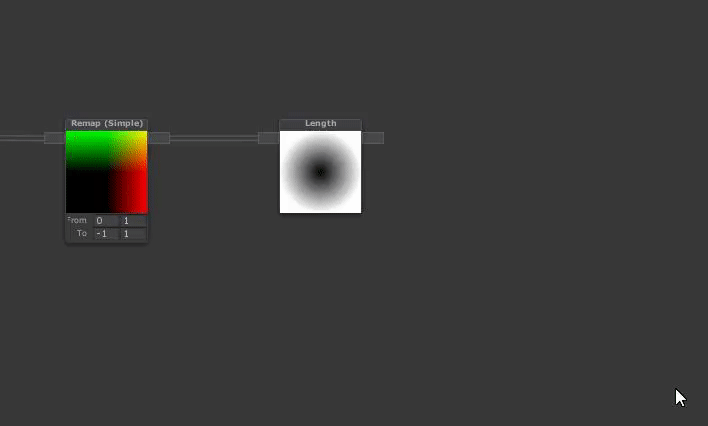
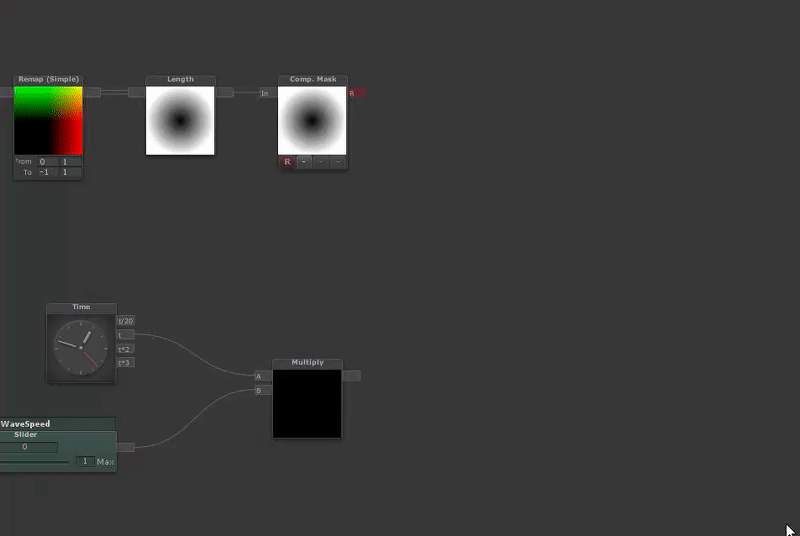
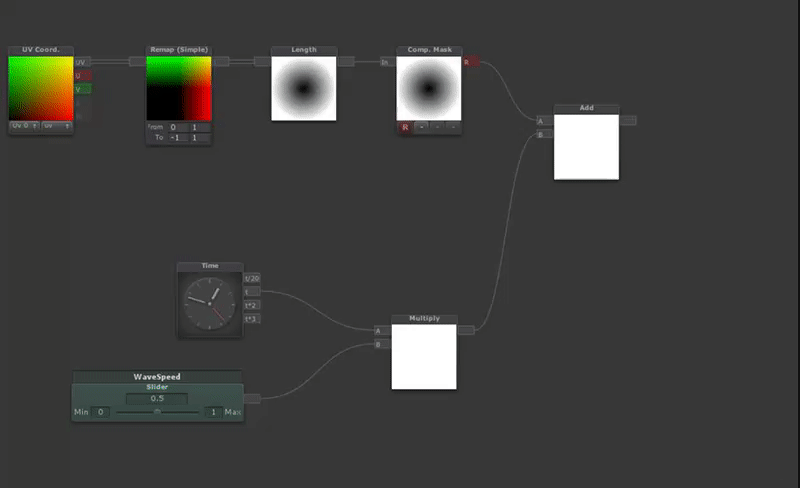
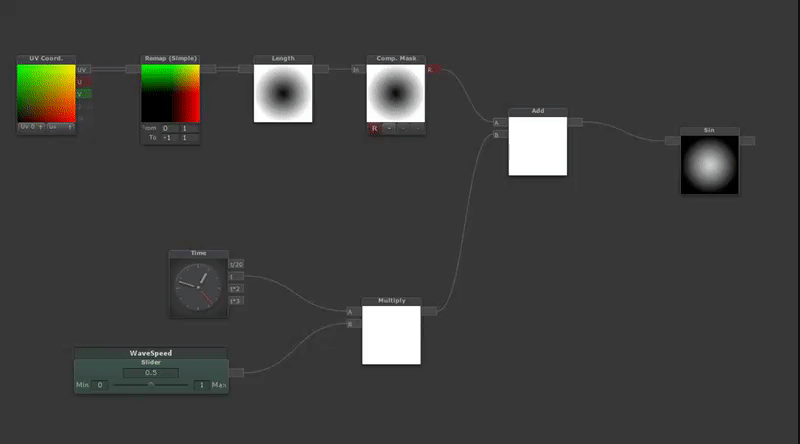
We are going to take the coordinates of the UVs of the mesh, then, we are going to remap that coordinates to move it a bit to the center, and the take the length/magnitude to make a nice circle. Hold U and scroll to “UV Coord.”, then hold R and scroll to “Remap(Simple)”, and finally hold L and scroll to “Length”. Then connect UV output from UV Coord. to Remap input, and Remap output to Length input. And now look! a nice circle!

Now, we need only 1 channel of this, so we are going to Hold C and scroll to “Comp.Mask” and leave it as default because we only want R channel.
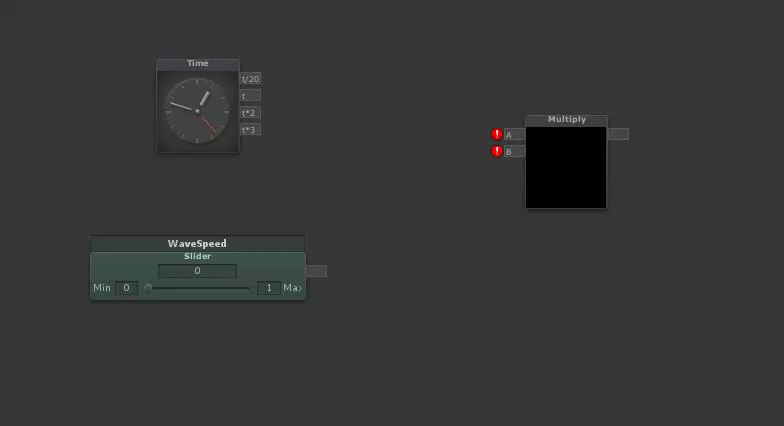
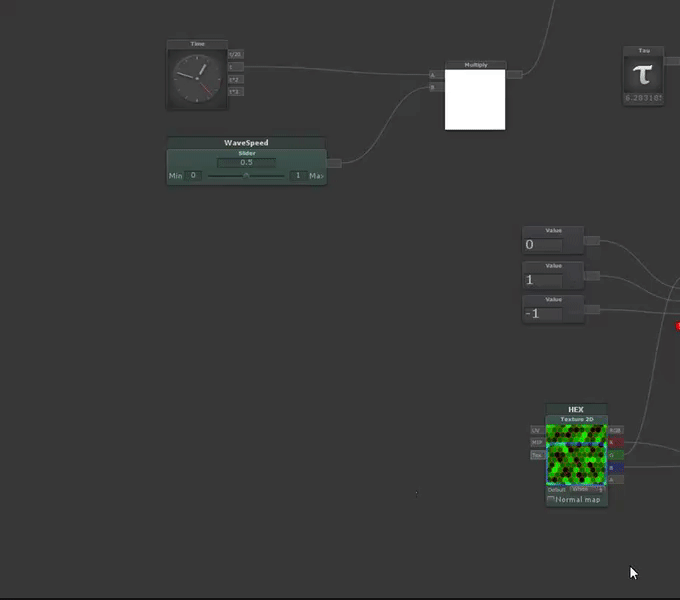
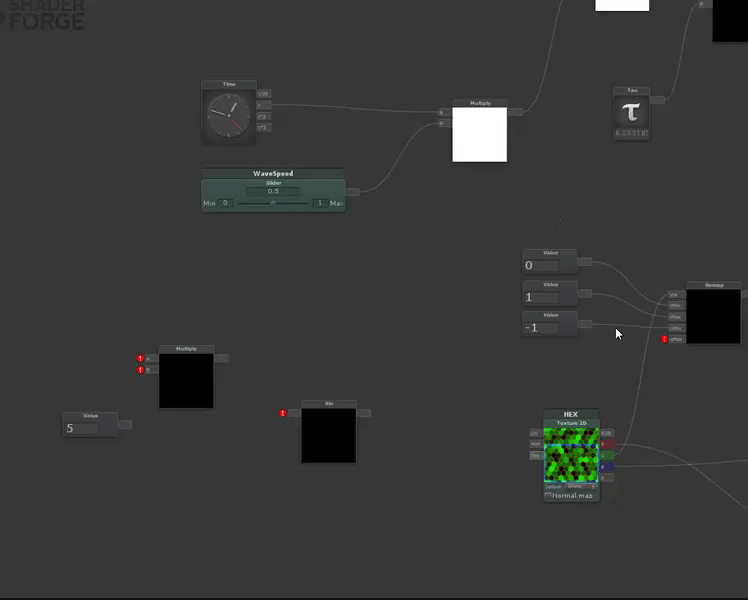
Its TIME to add the TIME CONTROL(was a joke). We are going to hold T and add “Time” node,this time node outputs time at different rates, then take another Slider node and call it AnimationSpeed, WaveSpeed… And combine “T” output of Time node with the slider on a multiply node.

Ok we have the circle and the time, lets combine it Adding the time controller to our nice circle with an Add node, so hold A and scroll to “Add” and put the Comp.Mask on A and the Multiply of the time controller on B.
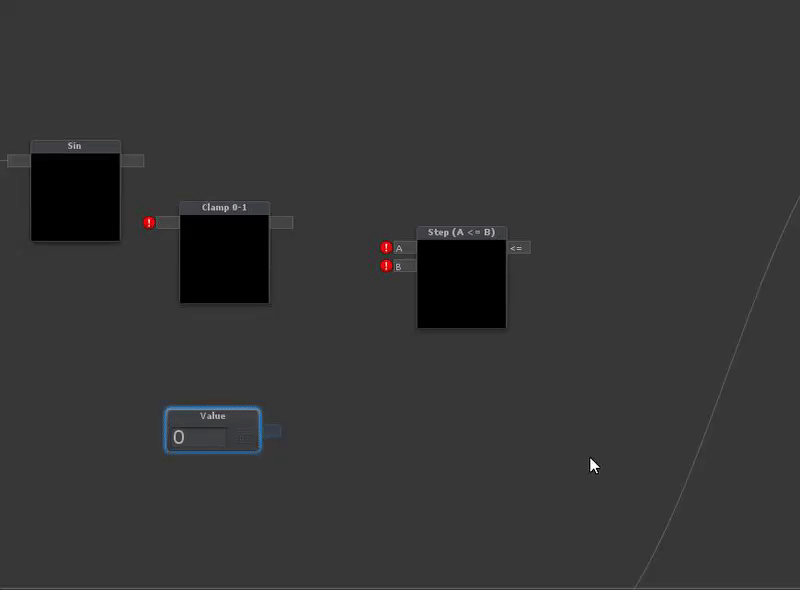
Now, lets add a “Sin” node and put that Add node into Sin, because of “WaveSpeed” is on 0 there is nothing moving, so put it to 0.5 and see how inside Sin node something is happening.What Sin node is doing is output the sine of the input.
But hm, thats not the waves we need, so, lets put a Multiply node between Add node and sin node and add TAU to the multiply node. To delete connections between nodes, put the mouse over the connection, hold ALT and RIGHT CLICK.
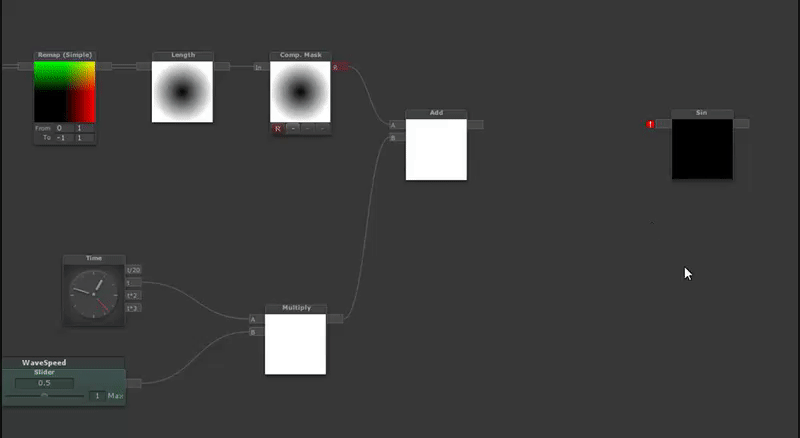
Maybe you dont see Sin preview now, its normal, a lil bug on shaderforge preview, but is working. To demonstrate it, connect Sin node to the “Clamp 0-1” node we made before and see the preview, nice huh?
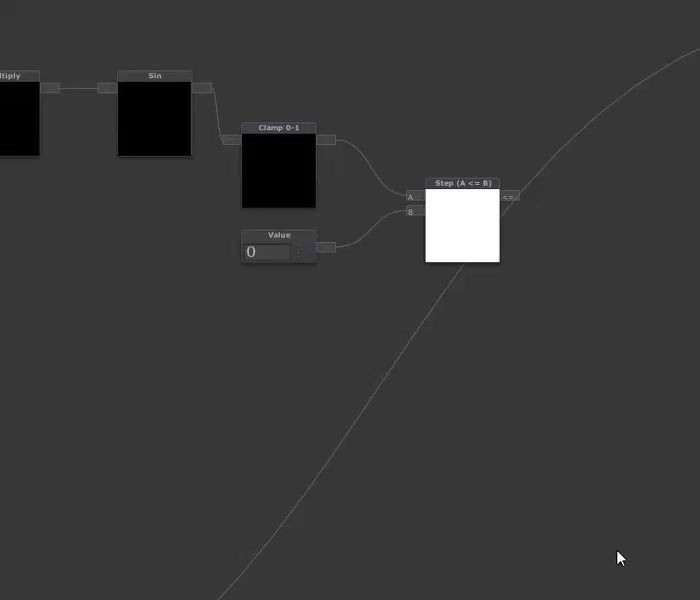
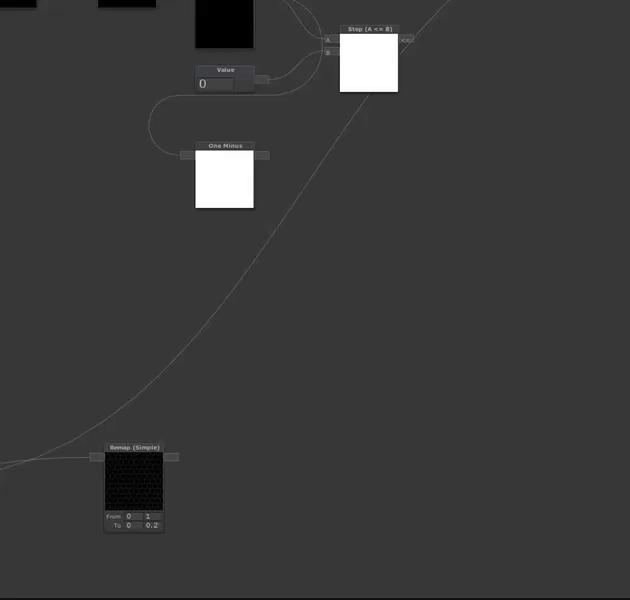
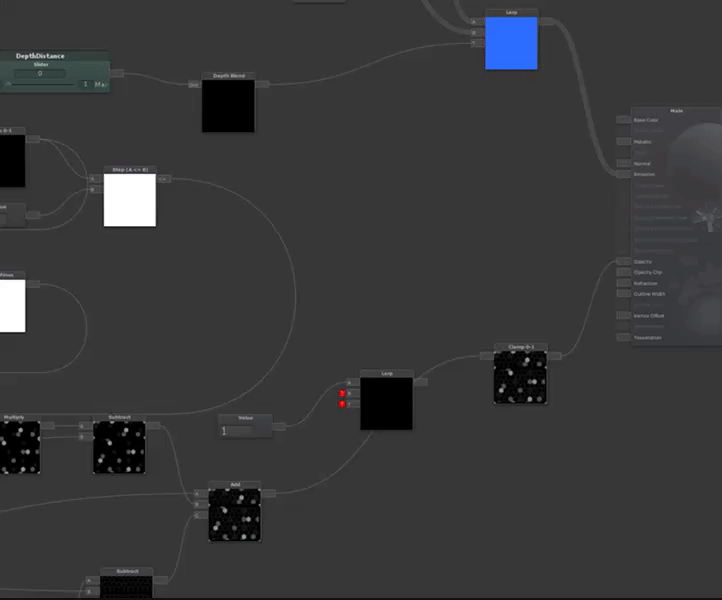
Okay, now we are going to combine the 3 guides on Hex texture and use the wave to blend between them and the opacity. First of all we want the waves to be smoother, lets get another Clamp0-1 node to clamp values of sin between 0 and 1and then add it to a “Step(A <= B)” node. So Hold C and scroll to take Clamp0-1 and hold S and scroll to “Setp(A <= B)” node, then hold V and scroll to “Value” What Step do is Output 1 if A input is less than or equal to B input, otherwise outputs 0, the final result is a sharper wave.
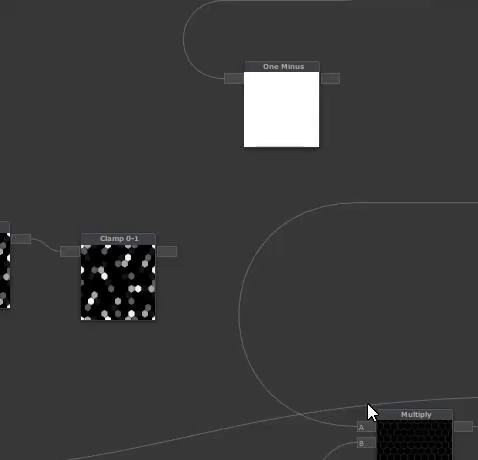
Hold O and scroll to “One Minus” node, that will give us the opposite of we have. And with that we have our 2 wave guides done.
Now lets combine this guides with the different guides on Hex. To be tidy lets start with R channel guide. We are going to Remap the channel then, Multiply the sharp wave guide with this remapping and then substract the B channel to the result. Step by step: Hold R and scroll to “Remap(Simple)” and modify “To:” values to 0 and 0.2, just to make it a bit darker because we are going to multiply so it dont go very saturated.
Then hold M and scroll to Multiply node and put the sharp wave guide on A and Remap on B
Because B channel is the mesh borders and we dont want this “grid” to be noticed in the borders, we are going to substract it from our latest result, Hold S and scroll to Substract, then connect last multiply node to A and “B channel” of Hex on B of Substract:
And, as you can see, the border guide has been deleted on the output, just what we wanted!
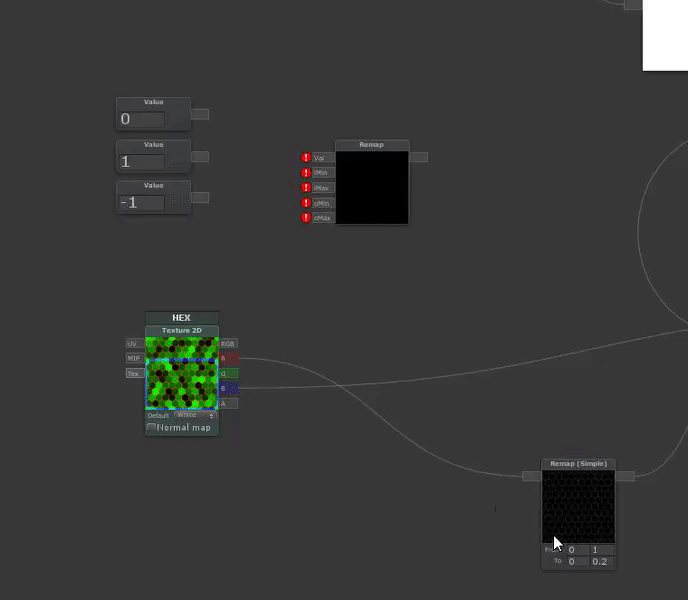
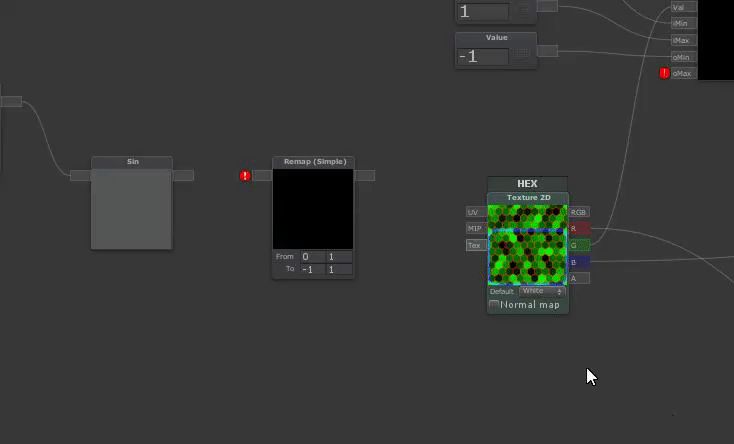
Lest go with G channel guide. We are going to remap it, but with a special remap, a remap who support changes on its outputs in realtime. So, hold R and scroll to “Remap”, then lets create 3 Value nodes, Hold V and scroll to “Value” 3 times, and type 0, 1 and -1 on them.(one trick for Value nodes is holding “1” number and only value will pop up)
Then, connect G channel to Val, 0 value to iMin, 1 Value to iMax,-1 value to oMin. i and o are essentially i=input and o=output. We are leaving oMax to a value that will change in realtime thanks to the TIME CONTROL and the Sine value.
So, lets connect a Multiply node to our Time Controller, with a value of 5, connect it to a Sin, and remap it to avoid getting black output. Hold M and scroll to Multiply, and hold 1 and scroll to Value, then type 5 on that value and hold S and scroll to Sin.
Hold R and scroll to “Remap(Simple)” and change “From” to -1,1 and “To” to 0.5,1 and connect it to remap oMax
Now you will be able to see on Remap node, what we are trying to achieve with this effect, blend between different hex to make it more dynamic.
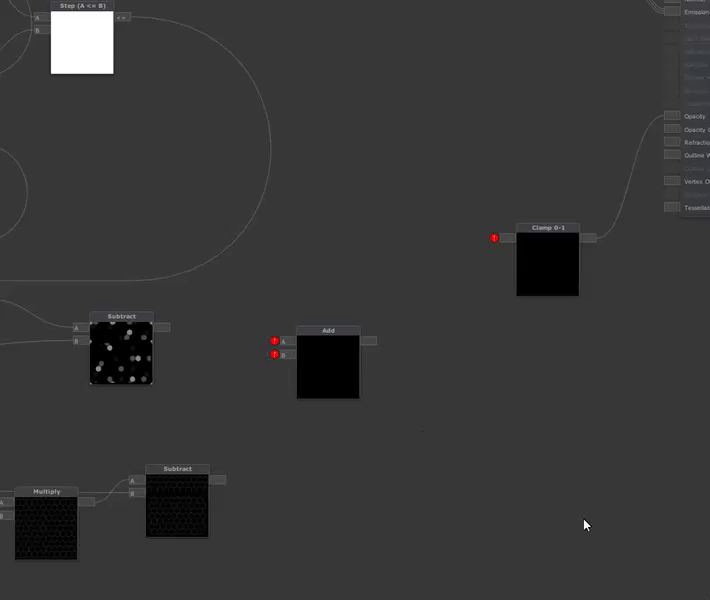
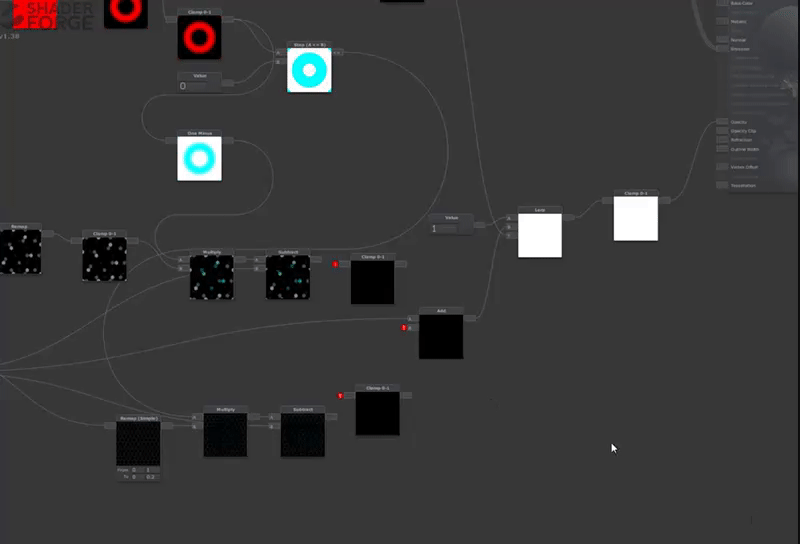
Before making the last channel lets combine these 2 and see a bit the result to be motivated :) First, we will clamp the remap, hold C and scroll to “Clamp0-1” and then Multiply the OneMinus wave guide to the clamp. Then, like on the other channel we are going to substract the B channel from this to avoid the borders and then combine them with an Add node. Hold S and scroll to substract, connect the multiply to A and the B channel to B.
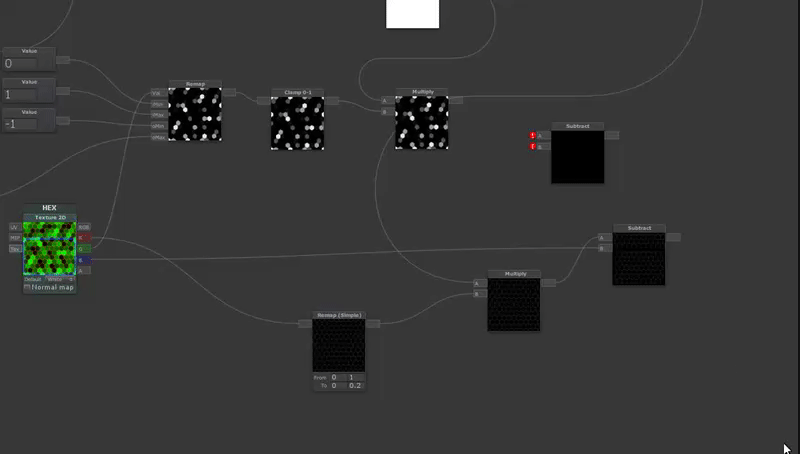
Now, hold A and scroll to “Add”, connect last substract to A and first substract to B and then connect the Add to the Clamp0-1 we before connected to Opacity. And then enjoy the waving :D
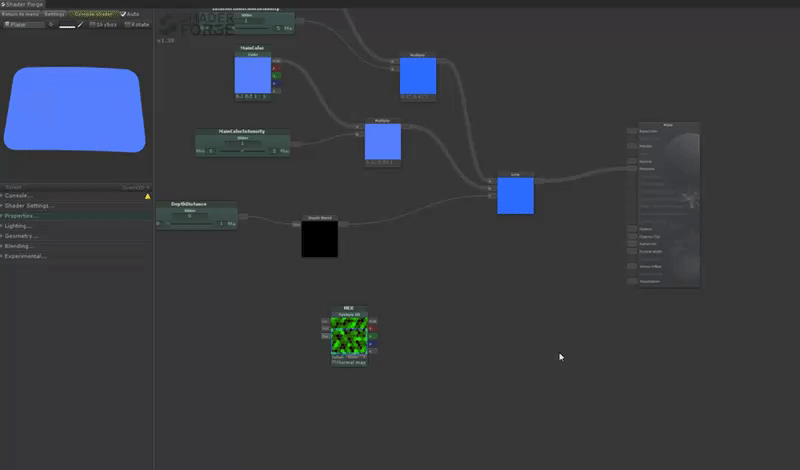
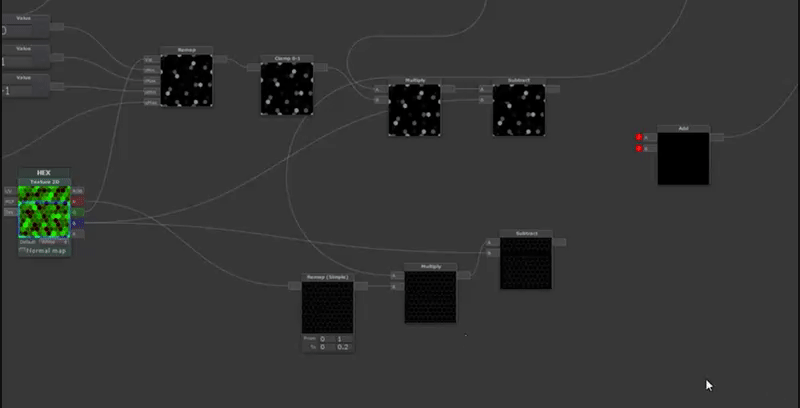
Pretty nice huh?? lets make a little break and see what weve done, scroll out and see the node tree:
 Seems pretty big, but hey, YOU MADE THAT!!! I will wate here for you to go to the bathroom :)
Youre back? okay, we are pretty close to the final. Now, lets add the B channel guide to Add node to combine this 3 channels nicely.
We are heading to the last issue of the shader, we dont have our “Intersections” because opacity does not include it!! DONT WORRY, our friend LERP is here another time to save our lifes. Lets hold L and scroll to Lerp, hold 1 and scroll to Value. Then, type a 1 into the value, and connect the value into the A of the Lerp. Connect the Add of our 3 channels on “B” of lerp, and finally, on “T” input of Lerp put the “Depth Blend” and conect this lerp to the Clamp0-1 connected on opacity.
The last thing is to clamp both Substracts because the substract its causing that our B channel is not adding. Why? well, we substracted 1 from 0 so now we have -1 and adding both substracts that make -2, so if we add 1 (our B channel) that doesnt make anything, so if we clamp it between 0 to 1, when we add 1 from our B channel it will add it perfectly
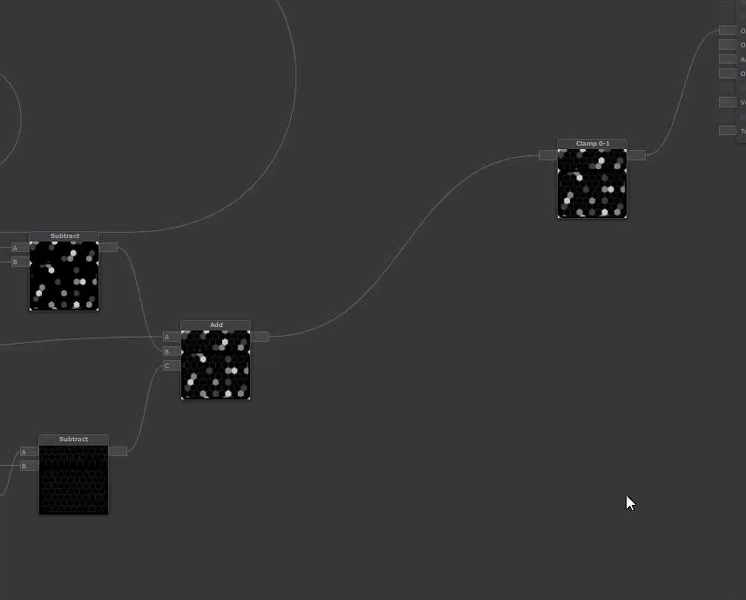
 (this image and following will have something different in the node previews because i restarted the pc and shader forge bug fixed)
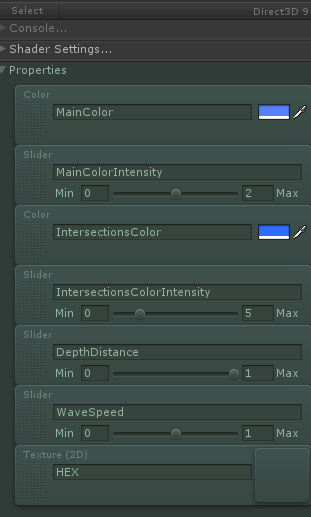
Lets finishing leaving all neat and tidy. Go ahead to Shader properties, on the tab called Properties and tidy up that.
FINISH LINE FOR SHADER
Congrats!!! You made it!! take a lil time to scroll out and see the node tree. And you were saying you werent going to be able to do this.

Lets close the ShaderForge window and head up to the material properties. Make sure that “Animated Materials” is select.
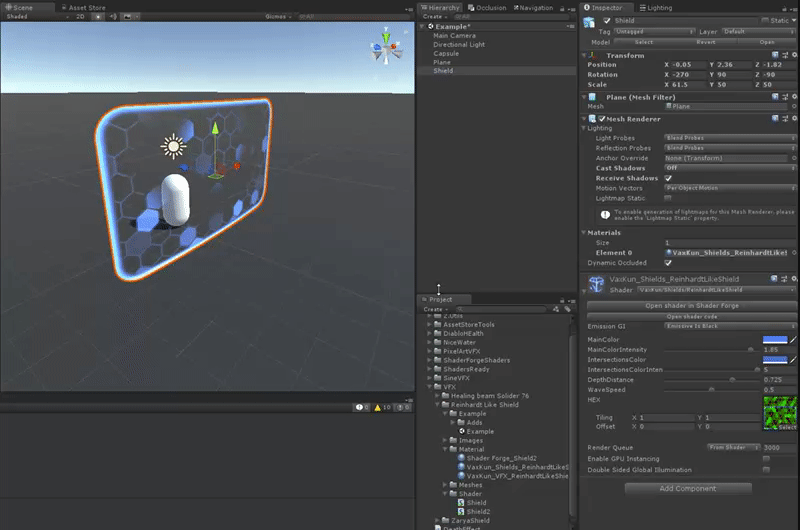
It seems like its something missing… LETS ADD SOME POSTPROCESSING!! Because we are very smart and we added PostProcessingStack before, we only have to do 2 things. Add the script to the camera and modify the post processing properties.
Head up to the camera object and click on “Add Component” and add “Post Processing Behaviour” script.
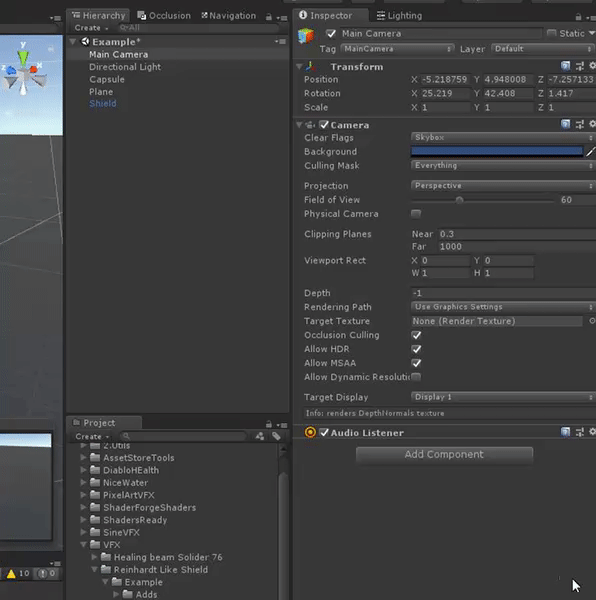
Then we are going to create a new Post Processing profile and adding it: Antialiasing to smooth borders, Bloom for the emissions, and Color Grading to make all colors nicer. (not going to dive into all postprocessing on this tutorial)
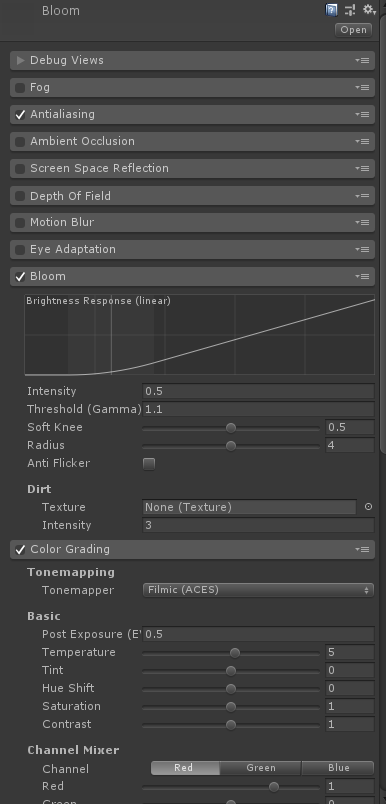
Then, add this “Bloom” post processing profile to the script on the camera.
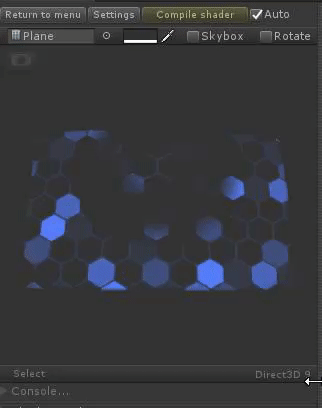
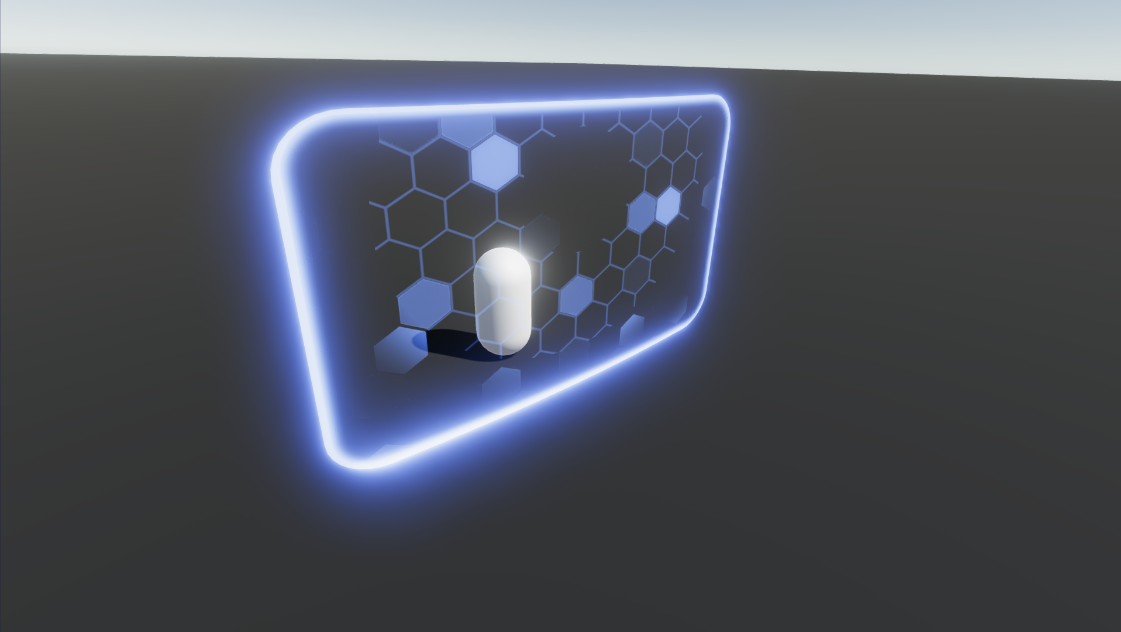
AND THIS IS THE FINAL!!!
Looks nice tho. I will leave here some nice colors of the shader, and interactions with meshes

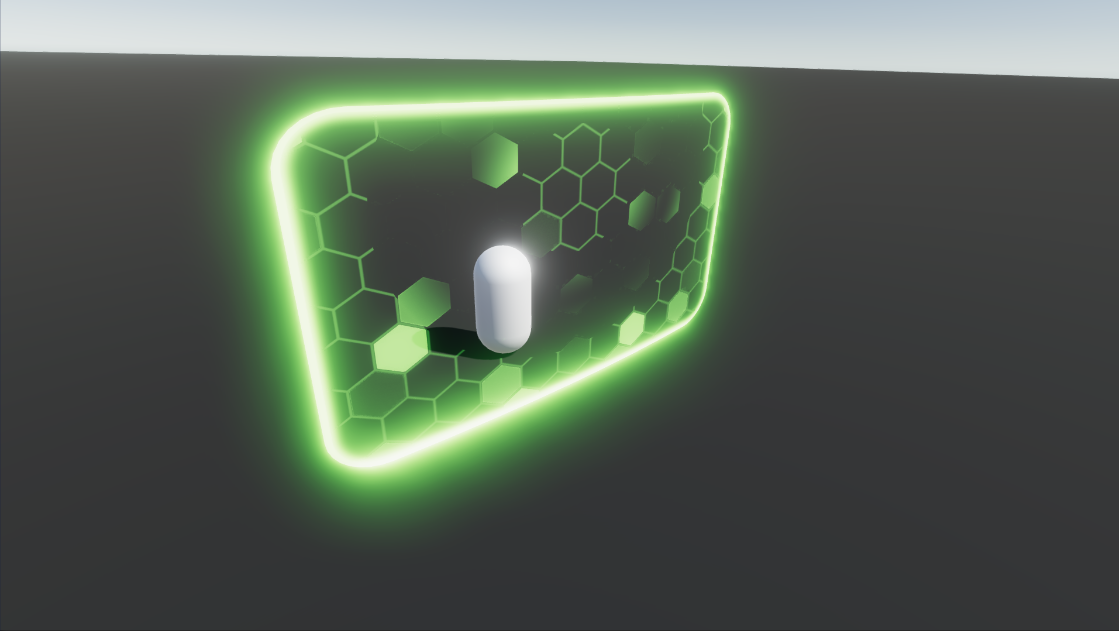
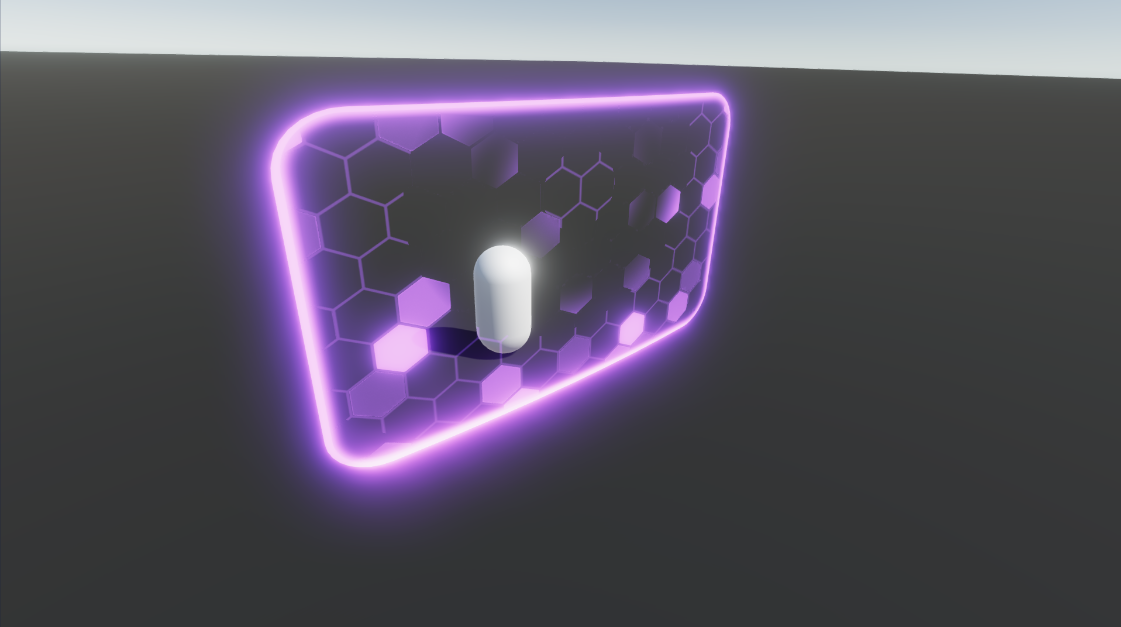
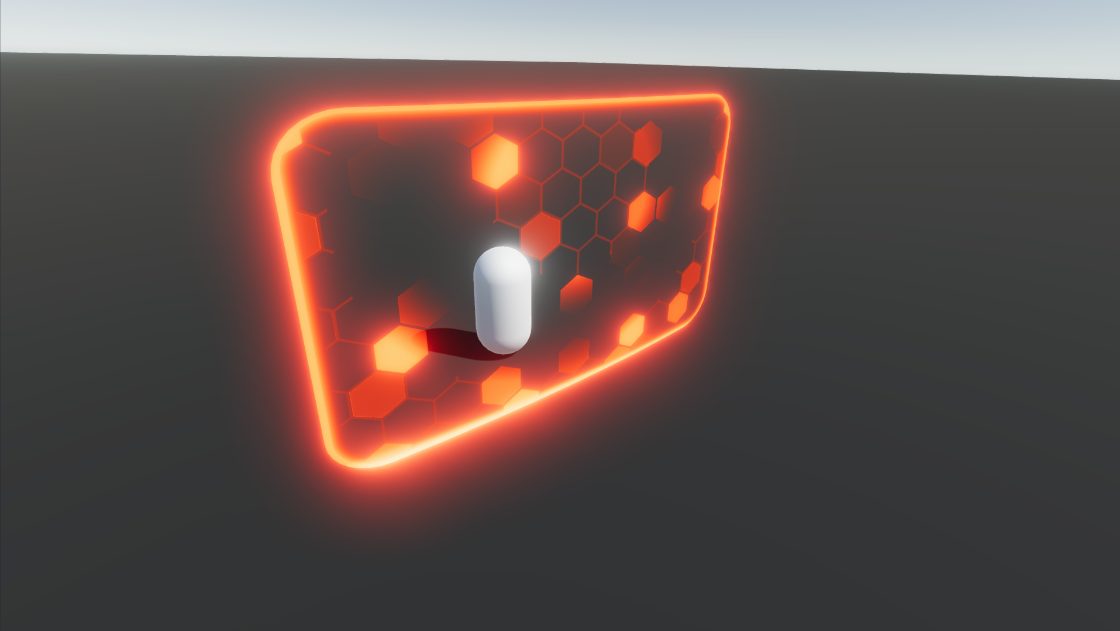
Of course feel free to mess out with intensity, depth, colors and maps. Enjoy it!!
Donations and credit allowed :P
Have a good dev day!!
Let me know what you think of this article on twitter @VaxKun!